I've updated my website and blog and it now lives in a new location! 
Come visit me at nissalynninteriors.com

A New Kitchen Faucet is a Game Changer!


*I received free product from Spectrum Brands, but the opinions expressed here are my own.

As a mom of five kids, I use my kitchen faucet a lot! My old kitchen faucet was leaking and having problems with the sprayer retracting back into the faucet. It was also very hard to maneuver. So needless to say, I was getting frustrated and it was definitely time for a new one! I knew I wanted stainless steel to match my kitchen cabinet hardware and appliances. I also knew I wanted a faucet with an easy to use pull down sprayer, and a soap dispenser. Pfister Faucets came to the rescue! I chose Pfister for its design, quality brand name, and great reviews! My husband installed it last weekend and I love how it looks and how easy it is to use! What a HUGE difference! 

Before:              

                                                                          After:

We chose a faucet named the Wheaton. 


A  few tips when installing a new faucet:
   
1.  Clean out everything under sink.

2.  Turn water off under the sink.

3.  Have a large bowl to catch the water when you disconnect the      
    water lines. (You will have some water come out even with the
    water off.) A hand towel will be very helpful as well to dry your  
    hands and any drips.

4.  Disconnect the water lines and remove the old faucet. From here
    follow the instructions that came with your new one.

FYI: Newer homes usually have plastic water lines, so be careful not to cross thread the connection when installing the new faucet.


As my husband was finishing installing the new faucet he said, and I quote, “This is actually quite simple. It’s awkward getting under the sink, but the process is quite simple.”


With the faucet installed, it was time to put it to the test! The first thing you want to do is turn the water on and check for leaks. I ran the water and we had no leaks so I started doing some  dishes. The faucet worked amazingly!! The pull-down sprayer was so easy use and I felt with the high arch I had so much more room in my sink! And I loved the soap dispenser it came with!

Seriously this is a game changer! Anything that can help a mom out is definitely worth it! And this new faucet does just that! Plus Pfizer has its Pforever Warranty that cover finish and function for life! If you're wanting to refresh your kitchen or need to replace a broken faucet - 
a Psfier is a great way to go!


Let's Talk About Pillows!

Tired of the current color scheme in you home?  
Pillows are one of the easiest and least expensive ways to change the feel of 
an entire room!


Here we have two shots of the same living room. They both have the same
furniture, rug and window treatments, same white tray and white candle sticks.
I just changed out the pillows and the florals! 
Now the room has an entirely different feel!


Mix and Match

Mix and matching fabrics and different textures is a fantastic way to create
an interesting look. 
It also looks more professional and custom - like you had direction from a 
decorator or designer. 
Here I have a navy block design pillow from Chloe and Olive a linen 
fabric paired with pillow from Home Goods in a polyester fabric.

Remember pillows don’t always have to match perfectly. Below is a fuzzy leopard 
print from Home Goods paired with a chiffon rose patterned 
pillow from H&M. Totally different styles and fabrics (one heavy, the other light), 
and yet, they compliment each other perfectly!


Inserts

Most pillows are sold just as pillow covers. So you will need to 

purchase the inserts for the covers. 
I have found that inserts at Pottery Barn are a little more expensive then other places, but they do 
last much longer! You are paying for quality! 
I've also used cheaper inserts from Ikea. They're great on the 
budget at around $7.00 an insert. 
Below are some Ikea pillows and inserts. Pillows from 
discount stores, such as Home Goods, Ross, Walmart, and Target normally
come with the inserts included.


3-D Elements

Another fun to dress up your pillows is with 3-D elements. Beads, tassels, 
buttons, rhinestones, and sequence all add texture and visual interest to the pillow - 
and to the piece of furniture it's being displayed on. 
See how the broach in the photo below, adds elegance to 
the gray ribbon. Without it, the the pillow wouldn't look half as fancy!
You can add elements yourself to any existing pillow with by hand 
sewing the item on. or using a glue gun.


Zippers

When choosing a pillow color, you might want to take into 
consideration the zipper. Most pillows have a dress zipper (left photo below). 
It does the trick, but if you're constantly switching out pillow
covers, or if the pillow is being laid on a lot, the zipper can fall apart pretty easy. 
However, pillows 
with a YKK zipper (right photo below,) such as these from 
Chloe and Olive, are much more durable!


Holiday Pillows

Pillows are the especially perfect for decorating for the holidays! 
In fact, it seems almost every home decor retailer has a line of holiday pillows now! 
Pier 1, Target, Pottery Barn, and Home Goods, are 
just a few of my favorite places to buy holiday pillow goodness! 
Boutiques and specialty home decor stores are other places to get one of a kind 
pillows that the masses don't have. 
Krumpet's Home Decor is one of my favorite online home 
decor stores for holiday goodies.

It's been fun sharing my thoughts and experience on pillows with you,
now go out and have some fun some shopping!

5 Tips for Arranging Fresh Flowers!

 Fresh flowers make any space beautiful!
They're one of my favorite things to photograph. 
However, sometimes they can be tricky to to arrange right, 
so I always ask my daughter Kay-Lynn for advice. 
(She has her  Texas State Floral Licenseand lots of experience!)

Below are Kay-Lynn's TOP 5 TIPS for achieving the perfect fresh flower arrangement.


Tip #1

Always rinse flowers first to get any and all pesticides off. Then cut off 1/4 to 1/2 inch off the flower stems, but only after you’ve planned and visualized what your arrangement will look like.


Tip #2

If you're using floral foam. Let it soak for ten minutes before putting flowers in. 
Water foam every few days.


Tip #3

Use chicken wire horizontally at the top of the vase to keep your flowers in place. This will help prevent the flowers from flopping down.


Tip #4

Drop pennies into the bottom of the vase to help the flowers stay fresh longer.


Tip #5

Place largest flowers first, then fill in with the smaller flowers and greenery. Make sure to keep looking all around the arrangement for balance and even placement.  


Thanks for stopping friends! 
Hopefully these tips come in handy next time you have fresh flowers!


Let's Talk About Picking Out Gray Paint!

Oh my goodness summer has flown by! I apologize my blog has taken a back burner as I've been spending time with my family this summer and keeping super busy just keeping up with my five kiddos! But everyone year towards the end of summer, I start getting an itch to redecorate, or fix up things in our home. So today my husband and I went to Lowes and picked up some paint for some touch ups around the house. We're touching up walls before we start some new small DIY house projects (Don't worry - I'll share those in the coming weeks as we work on them.)

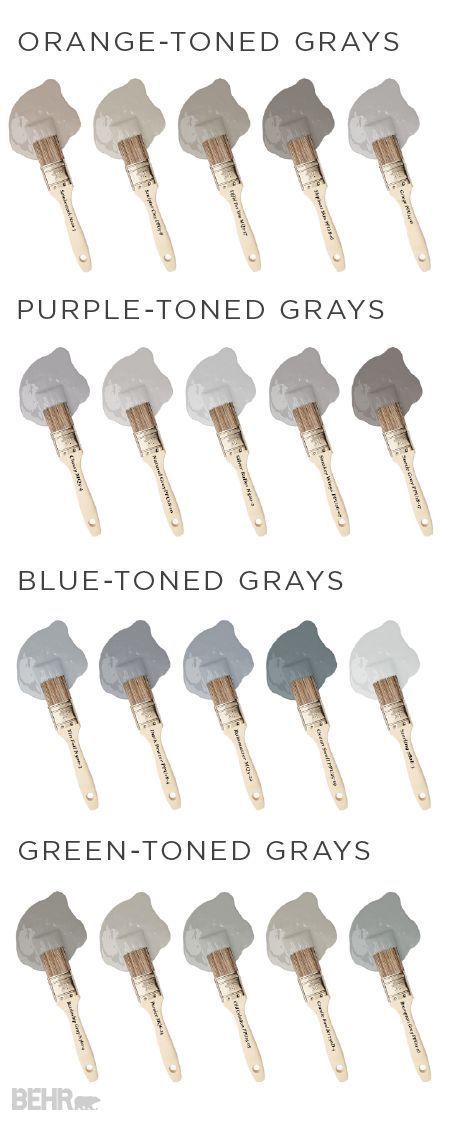
So lets talk about paint! Gray paint colors are definably the most popular paint color right now for residential and commercial areas. But with some many versions of gray out there - how do you pick the right one for your needs?

A great place to start is gathering suggestions from family and friends who have already painted with gray colors. Pinterest and the internet are also other great ways to aid in your search. And, of course there is always the old fashion to pick a paint color - going down to the hardware store and looking at paint cards, then bringing them home and placing samples on the walls.

However, grays paint tends to be a lot trickier than other paint colors. This is because gray paint is not a true "color," but more a "tint." This means it starts with a black color base and is gradually mixed with white to lighten it up. It does not have true primary colors in it like other paint colors. Because it's more of a pigment, gray paint tends to easily look different in different lighting. I had a client who loved Amazing Gray by Sherwin Williams. It looked fantastic in her living room, which had lots of windows, but looks mossy green in her hall way. I've seen gray paints show all sorts of undertones like green, purple, blue or even pink undertones! It all depends on the lighting and windows.


The best was to avoid undertones is to buy a sample can (They run any where from $2.98 to $6.50.) Then paint several LARGE areas in your home in several different places that have different lighting. A small painted area will not give you the true color. This is because a small swatch can be influenced by the existing paint color already on the wall.


(*Also note, never use the rest of the sample paint in the container for more than just the sample. Sample cans, because they're just samples, don't have a finishing protect agent in the paint, and therefore the paint will come off easy.)


Another way to test out gray paint, is to paint it on a medium size paper approximately 12'x18' inches, and hold it up to the wall. This helps to see what the gray will look like with out the existing paint color influencing it.

I hope this information helps on your quest for the perfect gray! I'll be sharing all paint color in my home in my next post. So stay tuned!


Welcome to My Baby Girl's Nursery!

Welcome to Miss Annalise Kathryn's nursery! I'm so excited to share with you my tips and tricks to achieving this princess look! 


To get started I combed the internet for ideas of what I loved. I chose the color pallet first. I saw the Love sing at Hobby Lobby and knew that the pink, gold and blush were it! I didn't want a lot of decorations and a I was on a tight budget. 


Next I looked for bedding in the color blush. I found the perfect bedding at Pottery Barn Kids. I bought the crib quilt, crib skirt, bumper and small pillow sham with Annalise monogramed on it. I really wanted a blush tulle crib skirt - but after searching high and low, I couldn't find the right one anywhere! So I took matters into my own hands and sewed a sheer silk fabric on top of the Pottery Barn Kids crib skirt. I loved how it turned out! I also sewed the white bows myself. I wanted a fabric to drape from a crown but didn't want tulle. So I used a similar sheer fabric as the crib skirt, and sewed a pink edge using biased tape.

And I have to tell you the gorgeous 100% raw silk blessing dress hanging on the wall was custom made by my extremely talented Mother-in-law Kathryn Parson. She made my dream blessing dress! 


The dresser was purchased from Ikea. We bought the corresponding glass top for an extra $30.00 to add an more feminine touch. My hubby sawed off the original square Ikea feet and we added round feet. He also added two pieces of crown molding - one to the top and one to the bottom of the dresser. The new molding helped make the dresser look more elegant.
We also changed out the knobs with glass/mirror ones found on Amazon. 
And the pretty pink chiffon dress hanging on satin white hanger was mine from when I was a baby!


After the bedding was done I picked out the paint. I picked out a color called Soft Pink Shell and painted a sample on the wall. It looked great - or at least the swatch did! So we bought a gallon and my hubby painted the entire room. It turned out horrible!!! So back to Lowes we went for another color. Bless my husbands heart, he painted the entire room again. This time it turned out perfect!
Then he added white trim work on the walls using quarter round trim. I love how it turned out! The trim gave the room wall decoration without having to put looks of knick-knacks up! To me, the trim helped the room look more regal and glamorous! 

I also receive the gorgeous custom made banner from Sweet Georgia Sweet. It was the perfect wall decor!
 The table and chairs I've had for fourteen years - it was in my oldest daughter's room when she was little. As my oldest daughter grew up, I kept the table and chairs in the play room un till now.


I bought the striped drapes four years ago from Linen-N-Things for my older daughters room. She thought they were to girly and did not want pink in her room! So I kept them in the package, hoping one day I'd have another girl again. When I became pregnant with our fifth child and found out she was a girl at her twenty-two week ultrasound appointment, the first thing I did when I got home was I pull out the drapes!  I was so excited!

I wanted gold curtain rods and could find any that worked - so we spray painted them! 


In continuing with the princess look, I wanted to drape fabric over the side on the crib. I also I wanted a crown for a topper for the drape to hang from. So I designed this box shape with crown moldings  with the crown in the middle. My super talented husband built the wood box with molding scraps, then he painted it white, and attached the crown to the box with several metal screws. 


Speaking of the crown, I bought it from Hobby Lobby and it was originally was hot pink! We spray painted the same gold color that we used for the curtain rods. 


More sources:

Silver table -Home Goods 
Leopard pillow -Home Goods 
Rug is from -At Home 
Chair - Costco
Frames - Home Goods
Lamp - At Home
Chandelier - Amazon
Floral - Pier1
Mirror - At Home
Tea Set- Amazon


SaveSave

Spring Fun with MacKenzie-Childs!

With Easter only a few days away, I'm excited to share with you an Easter table display with spring pieces from MacKenzie-Childs! I wanted to get this post out about a week ago but my computer died! Seriously, the screen went black and my computer is dead as a door nail! So I had to write this post and edit photos on my kid's computer after downloading software, transferring photos etc. 

But back to happier thoughts - I'm am thrilled to be teaming up with this amazing company MacKenzie-Childs! Their products are so whimsical, creative, and fun! They sent me a few pieces that I will cherish for years to come! 


The Morning Glory Pitcher is my favorite! The colors are so bright and cheerful! It’s a fun contrast next to the black and white egg plate, which has the signature MacKenzie-Child's Courtly Check design.  To carry on the black and white look, I added  a black and white dot ribbon to my cake stands. (And the cake plate stands are at Home Goods right now - I just saw them in their stores!) Going back to the ribbon, it also goes great with the adorable Easter Chicks!! They too have have the Courtly Check design and are too cute for words! (I'm constantly taking them out of the hands of my two year old because she wants to play with them!) I love the love the turquoise color the bottom half of the chicks so I added the turquoise napkins to match their chevron pattern, and add a pop of color. The white bunnies and gold colored eggs are from Target. The carrots are from Hobby Lobby, but I got them forever ago.


And being a gardening lover, I was very grateful to receive this darling gardening tool set from MacKezie-Childs. The tools are sturdy and comfortable to use. Plus, they're pink and black - my favorite colors! Thank you!


Hope you have a wonderful time decorating for Spring like I did! And have an enjoyable 
Easter with family and friends. 

Shopping Tips for Finding the Perfect Home Decor!

While out shopping, I saw this lantern and I knew it was exactly what I needed for the table by my stairs. It's always so exciting to find something your looking for!

Shopping for accessories can be overwhelming! Especially when you're pacing through the isles of  stores like Homes Goods or Hobby Lobby. Below are a few tips to help you sort through the hundreds of décor pieces to find your the right home accents for your home!


1. First, comb through Instagram, magazines, Pinterest, and online photos of rooms you like. 

2. Ask yourself: Do you like modern, traditional, or more rustic home décor styles? 

3. Decide what colors and styles you're drawn to. How do those colors and styles make you feel? Is there a certain store you just love and want to your home to look like?

4. Save pictures you love and look closely at how they decorated the details in the room. What did they put on that coffee table? What type of rug did they use on the floor? What kinds of colors did they use in their pillows? 

5. Then before you go to the stores, decide what specific items your going to look for, using your saved pictures as inspiration. It will cut down on time.

6. Know your budget. Decide if you rather spend money on several less expensive items or put all your money towards a piece that you absolutely love!

Happy Shopping!

Dollar Store Heart Wreath Tutorial

I LOVE Valentine's Day so much, and sometimes I just wish I could go into stores and buy everything that is heart shaped, red, pink, blush etc! (I have to constrain myself - especially at Target.) This year I wanted make a Valentines Day wreath- but I didn't want to spend a lot of time or money. So I took this Boxwood Wreath I bought at Target a couple years ago and transformed it!

To update this on wreath on the cheap, I went to Dollar Tree and bought three packages of heart picks at a $1.00 per package. Then I broke the sticks in half and stuck them in the grapevine part of the wreath. Next I added some Valentine's Day ribbon, (also purchased at the dollar store,) and made a bow. Now it's ready to hang on my front door! And it only took me ten minuets start to finish! 


Step #1

 Step #2

Step #3

Step #4


 Step #5

Step #6

Step #7


Updating a Space with Budget Friendly Ideas!

Every January, with the start of the new year, I like to make little, budget friendly changes to my home decor! It has to be on the cheap because we’re just coming off of Christmas where I normally over spend. (Oops don't tell the hubby.)

Some of the easiest ways to update any space is by painting an existing piece of furniture, painting decor already have, and buy a few new accessories - like a new rug. 
I'm going to share with you what I did to get it to look like the photo below. 


  I bought a new sofa about a year ago from Rooms to Go, but never really updated the room to go along with the new sofa. So, the first change I made was to update my coffee table. I sanded it down a bit, filled in the nicks with wood putty, and then spray painted it from black to white! I used a spray paint with a satin finish called Rustoleum - which I bought at Lowe’s. Because of the table's classic design and solid wood construction, there was no reason to buy new even if I had money in the budget. I purchased it from World Market over twelve years ago and it's been a staple in our home ever since. And now it has a clean, crisp, fresh feel! 

Next I dusted off an old black pair of wood candlesticks from my decorator closet - that I bought  Hobby Lobby a few years back. Then I spray painted the candlesticks white and will probably  distress them in the future for a more farmhouse look. 
(The wood ones replaced the silver ones - the silver ones were from Home Goods.)

Another change I added was to replace the rug under my coffee table. I've had the old aqua rug for the past five years and I wanted to switch to a neutral color. 

Rugs USA was kind enough to send me this gorgeous gray 5'x8' Tallahassee Floral Jewel Medallion Rug in grey.  It has the look of a stylish expensive rug - but so easy on the budget! A win-win! Plus, I love how it lightens up my entire room, and goes perfect with my newly painted coffee table and candlesticks. 

 I also placed fresh flowers in a mirrored vase for a pop of color. When the flowers die- I will replace them with silk flowers of a similar color, to maintain the fun color.

For low cost pillows, I went to my local Home Goods and picked up a few new ones with patterns. 
(I love mixing and matching patterns in my pillows because it creates dimension and interest.) I incorporated the new with the old and still created an entire new look!

I hope you find these decorating tips helpful as you update the space your in!
Check out the "Before and After" photo!


SaveSave